Showing posts with label DIY. Show all posts

Friday, December 24, 2010

DIY: Last Minute Christmas Table Sprucing

Hope everyone is ready for Christmas! I squeezed in a last minute DIY project this afternoon. We're hosting Christmas dinner tomorrow night for 17! YIKES! I needed a little something festive to add to the table.

I decided to give a quick and easy sprucing to my favorite, go-to water jugs. They're only $2.99 at Ikea and fit with any decor.


I had some extra plaid flannel fabric laying around so I cut a strip about 5" wide.


I then took bottle #1 and started rolling it over the fabric to cover the circumference of the bottle.


Next, take twine, ribbon, twill tape or anything else you have lying around. I used baker's twine for mine and wrapped it a few times to hold the fabric in place.


To make them a little more festive, I added some greenery (I stole it from my wreath!) You could also add some holly berries or anything else festive! (**OK, truth be told..I just wrote twigs and berries....I don't think that would have gone over very well! : )


And the final product....


I hope everyone has a very Merry Christmas Eve!!

Friday, April 30, 2010

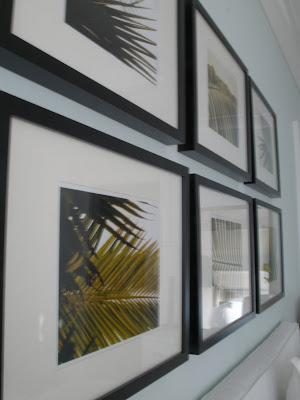
Gallery

I want to start off first, by saying that I had a fun project planned to post last Monday - but I was duped by Craig (you know - of Craigslist.) I had been coveting these completely amazing, set of 4 bentwood, armchairs that I was going to paint a soft, pale blue. They already came with white canvas cushions, and I was going to make pillows in a fun print. And this whole thing was going to go in my breakfast nook. But Craig tricked me!!!!! The chairs are teeny, tiny!! I'm talkin' chin on the table tiny. I drove all the way out to El Cajon (that's a long ways away) to pick them up. And you want to know what the worst part is???? I chickened out on telling the guy "no thanks!" That's right - I am the proud owner of too-short chairs that I can't use! Lesson learned.

Ok - moving on. As you know, I have been chugging away at re-doing my master bedroom. Side Note: I've decided that calling it a "re-do" is a little mis-leading since it really wasn't done in the first place. So do I call it my master bedroom DO? Anyways, I have been completely struggling with what to put over the bed. Does anyone else struggle with this? It's such an awkward place! You definitely need something that makes a statement. At first I was thinking framed sea fans - but after Aaron Brother's told me that they would do it for $225........PER FRAME, I said "no thank you!"
On to plan B.


Our very good friend/roommate is an amazing photographer. He's actually an engineer by day, but is an extremely talented musician/photographer by night. His Dad happens to be a landscape architect with an awesome yard full of every kind of plant you can think of. Combine the two - and I ended up with over-the-bed art!


Getting these bad boys lined up perfectly proved to be quite a feat! I used the brown paper trick. You trace and cut out the size of your frames on brown paper (or any color really) and then tape them on the wall as you'd like them. Using blue painters tape, you can move them around and arrange them easily.

{check out those straight lines!}


{Final Product}


I've always love the look of the random gallery walls. I don't think the random look was right for our bedroom, but I would like one to do one later in our living room.


{The mother of all gallery walls}


{Organized gallery}


Thursday, April 22, 2010

Wedding Straws

I'm staying true to my word and comin' at you with a fun wedding project I've been working on! I don't think I've said too much about our wedding on the blog so I'll fill you in. We're going to be having our wedding at The Inn in Rancho Santa Fe. It's a quaint, single story inn, built in 1922 by the young and talented Lillian Rice (you go girl!)

{The Inn circa 1920's-ish}


{The Inn today- We'll be getting married under the big Pepper tree!}


The overall theme of our wedding is going to be Vintage Garden. Our main objective is for it to be fun and a complete reflection of us! Because of this, we're not really following "the rules" on quite a few things!


{Our colors are mainly yellow with touches of green}


{We're thinking of adding little touches of green with succulents}


In true "me" fashion - I'm making a lot of the decor items myself (with lot's of help from mama seagrass!) I found some really cute, yellow, vintage fabric on-line and we're going to be making bunting flags to run along the edge of the building where our reception will be held. (I'll show pictures soon!) I wish I had pictures of the reception area - it's in a little private garden area under a canopy of outdoor, garden, ping-pong lights.


{Example of flag bunting}


Remember my Ball Jars post? We'll be using those scattered along all of the tables for tea-lights!


The part I'm MOST excited about (besides the actual getting married part of course!) I just found out that The Inn will be setting up croquet for our guests during cocktail hour, while we take our pictures! Next to the big tree that we'll be getting married under, on the other side of the pathway is a croquet lawn! Should be fun!

On to the latest wedding project I've been working on. Since we'll be getting married in August - notoriously one of the hottest months in S.D. (I know, I know, I'm not complaining - I know hot here, does not even begin to touch the kind of hot other places experience!) Regardless, we want to be prepared so we're going to be setting up a little refreshments table for guests to enjoy iced tea and lemonade. And what would iced tea and lemonade be without some vintage, barber stripe, paper straws???


{I made little flags that say "drink and be married"}


{I found vintage, paper straws online here}


{I've got quite a ways to go before I'm finished - but I had to share my start!}


**All wedding images found via Green Wedding Shoes Blog**

Saturday, October 17, 2009

Photobook DIY

Most of my blog followers (all 5 of you!!...hi mom, hi David! : ) already know the news, but just for the day when this blog has hundreds of followers (a girl can dream) I'll make the announcement. I'm engaged!! I will admit, I have been planning for this day for a while now (I've only had 9 1/2 years to think about it!) and I really wanted a fun way to ask my bridesfriends (I hate the word maid) to be a part of the big day! I went to Paper Crack, oh whoops, I mean Paper Source to brainstorm, spent way to much $ and ended up with some pretty cute photo books...if I do say so myself! : )
The books came as a little DIY pack. It includes 2 cardboard covers, and an accordion filler. You pick whatever paper you want to cover the front and back, choose a cute ribbon to tie it all together with, and top it off with any embellishments of your choice!

Close-up of the inside...I know you love that bathing suit pose!


For the last page, I figured it was a photo book so why not ask with a photo!
*Also inspired by some good friends of ours who sent us the cutest congratulations via facebook with the same idea!


They're finally done and ready to be sent off! I wish I could give them all in person but unfortunately half of them live in Northern CA, and will have to be sent. : (
I'm off to meet up with my sister who flew in from Boston yesterday...so excited!!